Revisiting the Picade in 2024

In 2014, I built a “bar-top” arcade machine powered by a Raspberry Pi running RetroPie. The cabinet was a kit from an early Kickstarter, and I wrote about my experience, including my personal mods on the design, in a series of blog posts starting here: Building the Picade Mini Part I

Now it’s 2024 and, suddenly in the mood to replay some old arcade games, I decided it would be a fun project to revisit my old Picade and see about giving it an upgrade.

The last decade

My Picade, and the “consolized” version I made later, haven’t been the center of my retro gaming for some time now. These days, besides original hardware, I usually play retro games on any of a variety of emulation handhelds, or on my custom Genesis Mini with my son. The little arcade machine has spent the last few years in a cabinet in the game room, but it wasn’t always tucked away. I used to keep it at the office when I worked for Xbox, and it got plenty of play during breaks. And while the original Pi powering it struggled with anything but the oldest arcade games (I distinctly remember a long running Flicky competition) I was still proud of it. But ever since I started working from home, the Picade sat collecting dust while I got my retro fix elsewhere.

It still works, mostly

Dusting it off and flipping the switch, I was glad to see it boot up exactly as I’d left it. My intent had always been for it to be more appliance than computer, so it didn’t matter that it hadn’t gotten a software update in a decade. It was like a little time-capsule of the early days of RetroPie-based projects, and it still worked.

Well, software-wise, it worked as well as it had ten years ago. But there were more than a few hardware issues (some new, some forgotten) that I decided would need addressing.

First off were the controls. The joystick was fine, but the buttons were just downright flaky. Some required you to mash them to register – some would register just by gently wiggling them without even pressing down. Not only that, none seemed to have a solid grip on the cabinet and could be easily popped out with just your fingers. So I was definitely in the market for new buttons.

The controller board still worked – it’s basically an Arduino Leonardo set up to emulate a USB keyboard – and I’d already customized the keys years ago, but that had also meant manually configuring each emulated system. Thankfully I knew both Arduino libraries and the Emulation Station controller setup had come a long way since then, and so I figured I could probably just rewrite the board to emulate a USB gamepad instead and be done with it.

One persistent issue had been the audio. The original controller board was also set to pipe audio to the speakers, but the signal was noisy and required you to use software-based volume controls, which I always hated. One of the final mods I’d done before was to install a dedicated audio amp and external volume knob. It’s not perfect – it is still unnecessarily noisy, especially at lower volumes or at quiet points like in-between levels. If you click off the volume knob it’s silent, but then there’s an annoyingly loud “pop” when you first turn it on. I figured it wasn’t worth messing with. Foreshadow… foreshadow…

The last issue was power – the old Pi needed a solid amp, and it didn’t really want you pulling too much more to power USB devices through its two built-in ports. So I used a 3A supply to power four devices in parallel: the Pi (through a Mausberry board for safe shutdowns), the monitor, the audio amp, and a homemade powered USB hub. I say homemade as I basically took a regular hub, cut the power lines to the input plug, and ran my own lines direct to my power jack.

The end result was four ports: one for the controller board, two for the plate on the back of the cabinet, and one still free, none pulling their power through the Pi. While I never plugged in anything more than a keyboard, I didn’t want to risk frying the Pi. This time around, I figure I can probably simplify things and just use the four built-in ports most newer Pis have.

Planning a new aesthetic

When I first built the Picade, the goal was to add every system I cared about with their full library, as an all-in-one retro gaming solution. I added every game ROM I could find, which in the end really made navigating and finding a game a bit of a chore. The “launcher” program, Emulation Station, was an ancient build by today’s standards, and just displayed giant plain text lists of ROMs for each configured system. To top it off, I only ever played a few games on it, usually the few working arcade games or their console ports.

I often fill up emulation devices with a system’s entire library, usually grouped into alphabetical folders using RomSort. It can be nice to know that I could drop into any game at any time. But I really enjoyed the experience of building the Genesis Mini, and rather than copying every single Sega game, taking the time to curate a small list of just my favorites. I decided early on, that if I was really going to upgrade the Picade, that I was going to stick to a curated list of arcade games I actually wanted to play. I wanted the system to feel like my Picade.

That decision to make the machine feel more personal to me, extended beyond the software setup. While the existing cabinet art was fine (and my favorite of the options in the original Kickstarter) I knew I wanted to really lean in and make it exciting for me to look at. Something that made me want to sit down and turn it on.

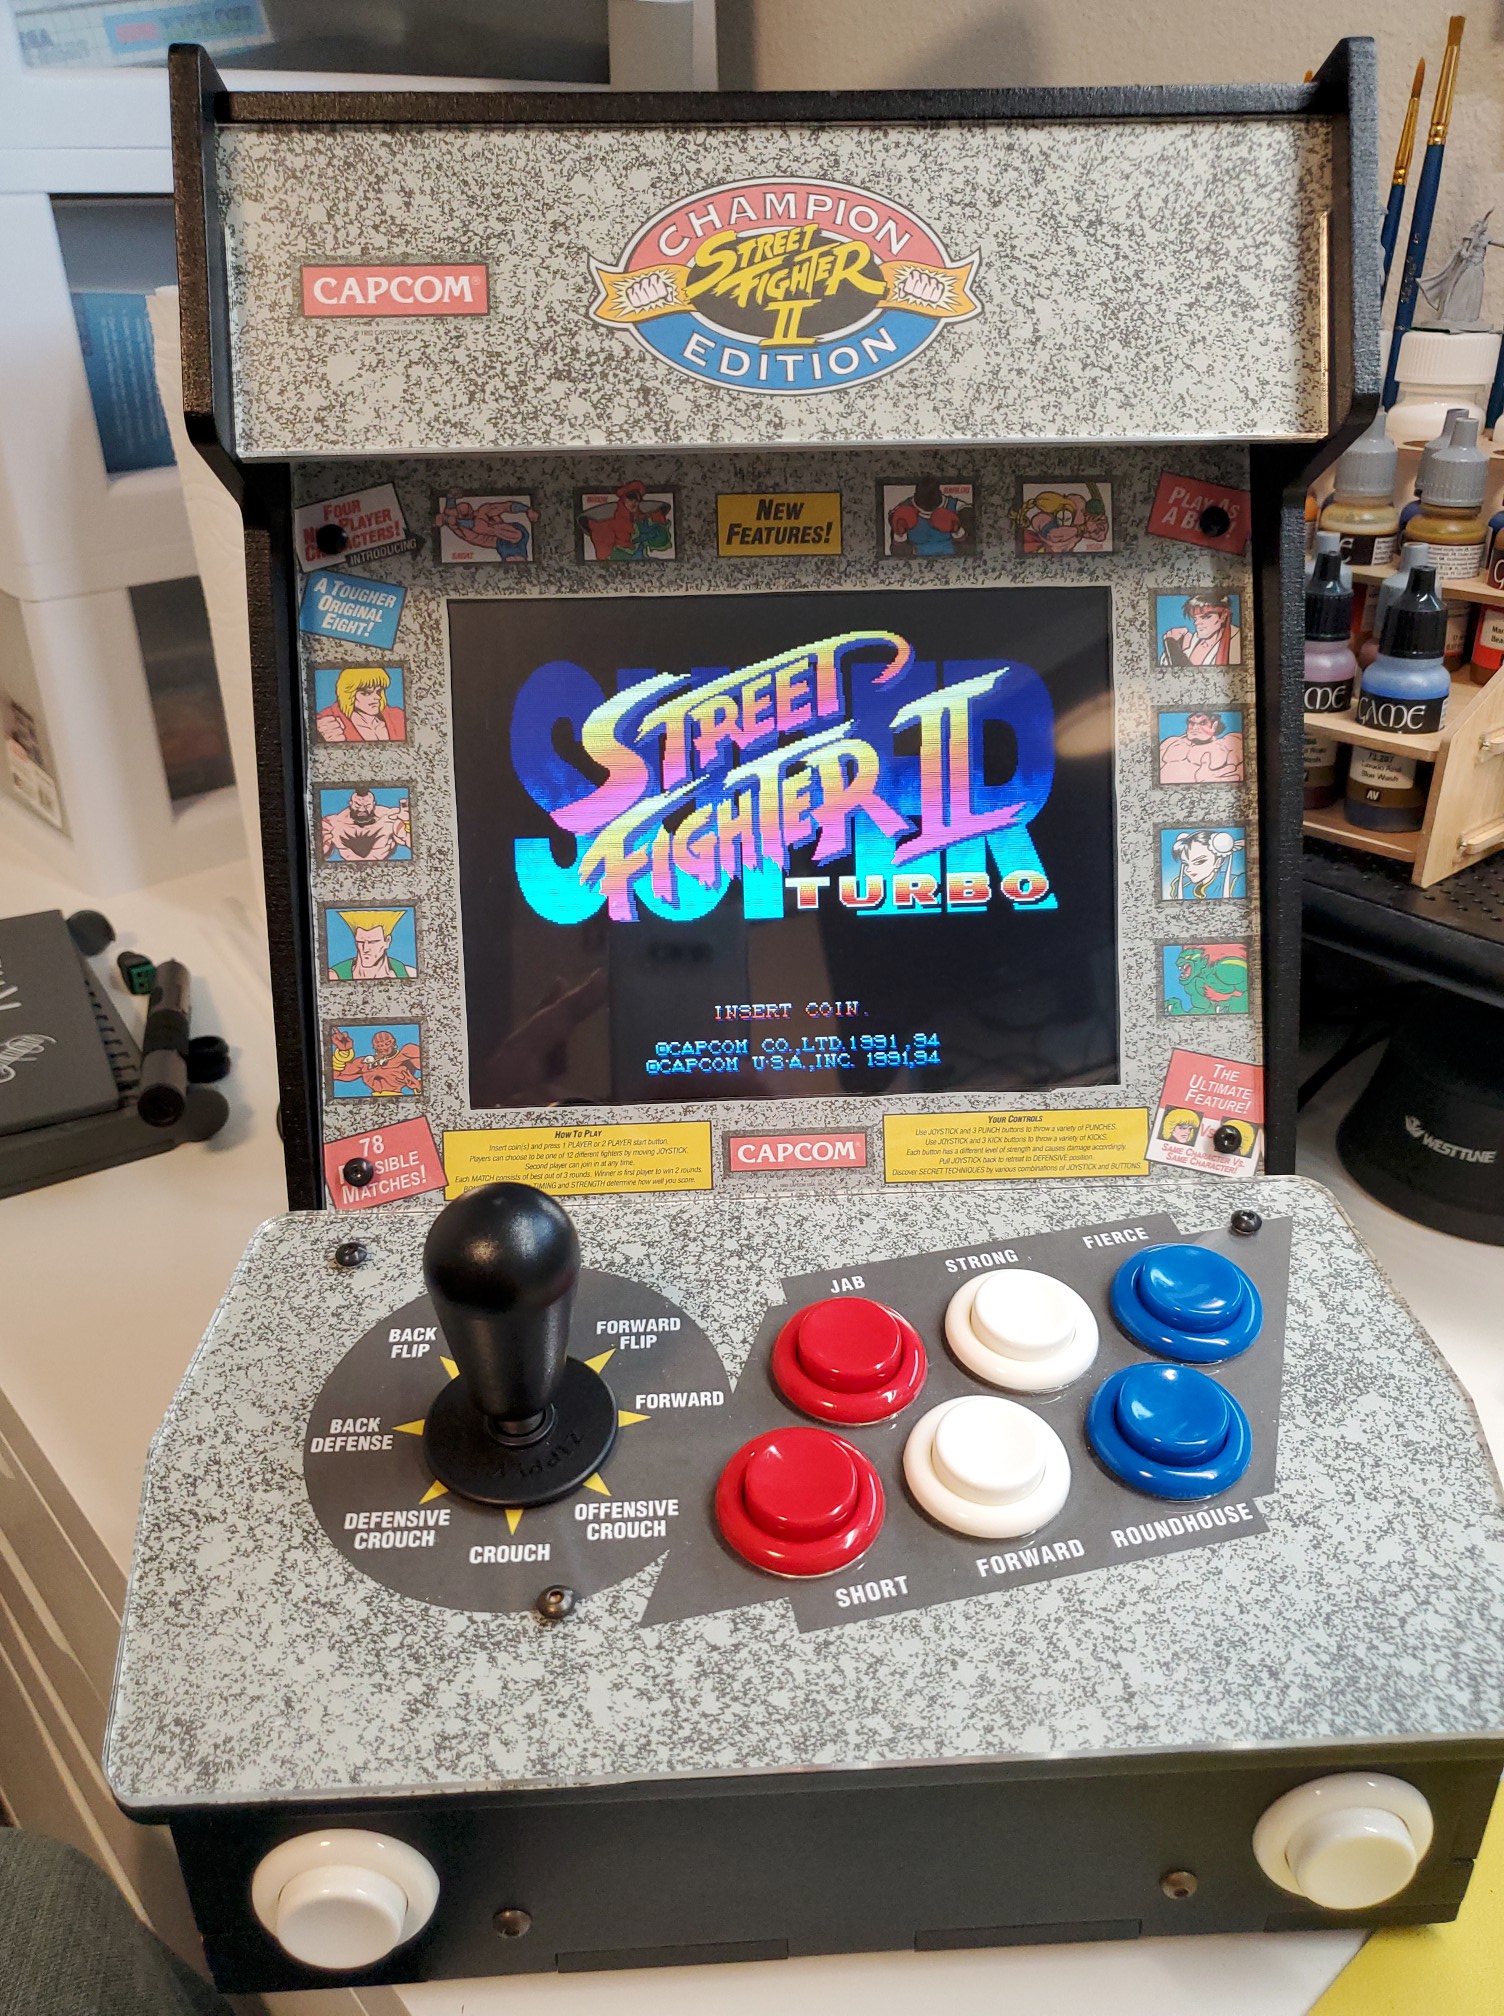
I decided I wanted to go with a Street Fighter design – some of my fondest “arcade” memories were of playing on an Street Fighter II Champion Edition cabinet at the San Pablo Reservoir where my grandfather used to work. The machine was outside the bait shop, sun-bleached and beat to hell, but I loved playing on it. I found high-res scans of that art at Arcade Artwork, so it was just a matter of reworking it for my mini machine.

Capturing some final media for posterity

Before getting started with the upgrade, I decided I wanted to capture some final footage of the old Picade:

And just so I wouldn’t have to scrub through that video for clues (in case I messed something up), I also took some final photos of the inside:

Buying some new parts

Once I had that final video and the aesthetic plan in place, I started tinkering and shopping for new parts.

I picked up a Raspberry Pi 3B for the new computer, knowing it’s not the newest or most powerful board, but trying to balance budget with my stated goal of just running a small selection of arcade games. It had everything I needed for a quick swap: 4 USB ports, micro-USB input, full HDMI output, and 3.5mm output for audio. The Picade only has a 640×480 monitor anyway – it’s not like I need one of the newer 4K-capable Pis.

The only other parts I needed were new buttons. I decided that, in keeping with the Street Fighter design, to switch away from the Japanese Sanwa-style buttons to Happ-style buttons, the kind favored by US arcades, as well as a “bat” top for the joystick. Unfortunately, real (or knock-off) Happ buttons are very long, and definitely wouldn’t fit in the Picade. Thankfully, I found the Canadian-based Retro Active Arcade, which carry Concave Fusion buttons – buttons with Happ-style tops but shorter by using Sanwa-style internals. Best part, they use locking rings to lock them place (no more easily removable buttons).

Designing some new cabinet art

While waiting for my new parts to arrive, I got to work designing the new cabinet art. Thankfully the original Picade Kickstarter included to-scale PDF blueprints for all of the parts. So with a little work in Inkscape, I was able to create SVG templates that I could then fit the art to. I started with the simplest piece, creating a new marquee (my marquee SVG template):

That was a pretty straight forward resize of the original art, so next I went to work on the control panel (my control panel SVG template). I started with a clean base of the black and grey pattern, then added the joystick circle in the right place. The button design took a little more work, as the original machine had six buttons arranged in a rectangle, while the Picade had a more modern, slanted parallelogram layout.

But once I was happy with my design, I printed our some mocks to check the size:

New buttons, new control panel, new marquee

With the mock-ups done (they fit perfectly), I began disassembly, starting with the control board:

I replaced the buttons in the bottom of the cabinet first:

They fit perfectly, and with the locking rings they weren’t going anywhere. But one thing I noticed (and this will come up later) was that the wires for the audio amp (on the far right) looked pretty smashed and sketchy looking. Anyway, I continued on with the control panel, replacing the buttons and the art all at once:

Finally I printed and installed the marquee:

Customizing the screen matte

It was when I’d gotten this far that I needed to make a decision about customizing the screen matte. The original black was plain and functional, but if I really wanted to capture the aesthetic of a Street Fighter II Champion Edition cabinet, I knew I’d want the official art with all of the character portraits. So I went back to the computer and started reworking the art to fit (my screen matte SVG template):

The hard part, I knew, would be installation. I’d have to remove the entire monitor assembly and break the seal on the existing screen acrylic, risking dust and debris getting inside. And I was right, it was a complete pain to do, as I not only had to re-remove the control panel and marquee, but all the monitor support mounts (and even the LCD panel itself) fell out as soon as I started to take it apart. I really had to rely on my “before” photos to get it all back together:

But with that finished, I think the final result was worth it:

A quick first test

Once I got everything back together, I decided it was time to quickly verify I hadn’t broken anything by starting it up with the original board (hence the incorrect screen resolution for the arcade game):

Upgrading the controller board

With new buttons installed and working, the next bit of work was to update the software running on the controller board (as mentioned above, basically just an Arduino Leonardo). Ten years ago, the best option was for the board to emulate a USB keyboard. Now, I’d already had experience changing that code, as I’d done so to pick my own key mapping back in 2014. But for this upgrade, I really wanted to ditch those limitations and emulate a proper USB gamepad instead.

Thankfully, someone’s already done the hard work, creating a Joystick Library for Arduino. So, using that, I quickly modified the existing controller code to send joystick inputs instead of keyboard inputs (my joystick code). It was quick and easy and worked perfectly!

Installing the Raspberry Pi 3B

With the controls and art complete, I figured it was okay to replace the original Raspberry Pi with the shiny new Raspberry Pi 3B and a fresh SD card flashed with Batocera, a very polished linux distro for optimized for playing retro games.

And that’s when a whole new host of problems reared their ugly heads.

First off, the board simply wouldn’t boot, giving an “undervoltage” error. Turns out I hadn’t accounted for the extra power the new Pi would draw – my 3A supply simply wasn’t enough to run the Pi, the screen, and the controller. So I ordered a 6A power supply and twiddled my thumbs until it arrived. With that in place, I got the machine to boot, and even load a game:

Everything was (mostly) fine, unless I touched anything inside while it was running. The machine would lock up or reboot, or there would be a healthy increase in noise coming from the speakers. I started by cleaning up some of my “early amateur soldering” for the monitor and amp power wires:

Then I decided to simplify the situation by removing my amateur “powered” USB hub as I’d already planned:

Fixing the audio problems

Even with that wiring cleaned up, there was still a problem with the audio. The noise coming from the speakers was atrocious, and worse, clicking on the amp caused some kind of power spike, causing the Pi to lose power for just a second and hard reboot.

I remembered how smashed the wires into the amp looked, and made the decision to open the control panel back up and rewire it. I removed the very ugly and amateur collection of electrical tape wrapped pins I’d soldered in place before, and installed actual JST connectors:

Unfortunately, even with those fixes, I couldn’t solve the issue with clicking on the amp causing the power spike. I’m not enough of a hardware guy to know what kind of circuit I need to protect against whatever transient condition happens when this (click on?) potentiometer makes first contact.

Regardless, I was able to finally get rid of the speaker noise. I rerouted all the wires so audio wouldn’t run parallel to power, made the power lines as short as possible, and installed a ground loop noise isolator. I also installed a proper 4 to 3 ring 3.5mm adapter, since the Pi 3B outputs both video and audio from its 3.5mm jack, and I didn’t want any noise from that.

So it wasn’t a perfect fix – if I turn on the main power with the amp clicked off, clicking it on will cause a hard reboot (and potential SD card corruption). If the amp is clicked on (even at the lowest volume), then I can turn it up and down without a problem, giving clean, noise-free sound. I can even click the amp off and back on when everything’s already running without a problem. So I’m just extra careful to never click it completely off, and that’s good enough for now.

The final bits

With the major issues addressed, the final bit of hardware was to install a couple heatsinks on the Pi. Not strictly necessary perhaps, but $4 for a little peace of mind was worth it:

With that final bit installed, I went ahead and copied over my favorite version of Street Fighter: Street Fighter II’ Hyper Fighting, and started it up for one final hardware test:

It worked perfectly, running at full speed and filling the screen, even with a video filter enabled to simulate the slightly fuzzy look of an older CRT screen. I love it.

Setting up Batocera

I won’t go through all the minutiae of setting up Batocera to my liking, but the experience was very satisfying. I changed the default boot and loading images to Street Fighter art, and set it to boot directly to my list of favorites. There’s a built-in menu to set up the Mausberry shutdown circuit, which was very nice and completely unexpected. I had to tweak some audio settings to deal with known audio issues with Raspberry Pis (which I didn’t know before), and I set up the WiFi so I could easily copy games over from my PC without having to shut it down and remove the SD card.

As for games, it’s mostly fighters and beat-em ups, but there’s some other classics on there as well. I’ve got about 100 arcade games on it already, and I’m running out of ideas for more. There’s even built-in “metadata scraping”, so instead of raw ROM lists, each entry shows the game title, the year it came out, a description and a screenshot. It’s all very slick.

The final result

I am thoroughly pleased with how the new Picade turned out. A little more work than I expected, but it only took me a couple days, not including waiting for items to arrive. To cap the project off, I filmed a video of the new Picade in action:

/jon

Making my perfect dice set

I used to play Dungeons and Dragons in high school and college, but I eventually left the hobby as it took up too much of my free time. Now, some twenty years later, after the isolation of the pandemic and lots of “Zoom fatigue”, I thought some face-to-face tabletop role-playing might be fun to pick back up.

While there has been a recent resurgence in D&D popularity, I wasn’t really interested in playing actual D&D specifically. In fact, I was more interested in sampling from the wider range of other TTRPGs in the market. I was mostly starting from a clean slate: I had given away all of my old RPG books and materials over the years, keeping only a copy of the Fudge rule-book and my old bag of dice.

I started by researching what games people were playing these days, and signing up to play in various one-shot games hosted at Verne & Wells. Seeing the range of dice systems in use, I decided that it might be a fun mini-project to try and build my own “perfect” dice set to cover my needs for any game I tried. To that end, I dug out my old dice bag and took stock of what I already had.

My old dice

Backing up some 25 years, the first D&D product I ever bought was the Introduction to Advanced Dungeons & Dragons Game box-set. Along with the booklets and miniatures, it included a single set of polyhedral dice.

These seven dice (green d4, red d6, blue d8, white d10 and d% percentile, yellow d12 and orange d20) were the main dice that my friends and I used to play second edition D&D (AD&D 2E) for years. Their specific colors impressed themselves into my psyche: d20s are orange, d12s are yellow, etc.

When I got older I started playing in public games outside of my friend group, and it was there that I was exposed to the wider variety of dice habits in the hobby. DMs with massive bags of dice, players with their own carefully selected matching sets, and everything in-between. I felt a little out of my place with my multicolored seven, and was eventually convinced to get a new set.

I settled on a set of clear dice with white numerals. We were playing the new D&D third edition at the time (D&D 3E), and following the advice of the other more experienced players, I bumped the count from seven to eleven by adding one extra d4 (for multiple magic missiles) and three more d6s (to make character creation faster, but also, fireballs).

I played with that clear set for a long time, but it had one major disadvantage: they were very hard to read on the table, and even harder to find when they rolled off. I stubbornly continued to use them until I lost a d10, and replaced it with a white and blue d10 to make rolling percentiles easier. I eventually I added a third set to my old collection: the same eleven dice, but this time in ivory with black numerals that I called my “bone set”.

All together these three sets (original, clear, and bone) I carried around in a purple Crown Royal bag. I know, a classic. But funny side note: I didn’t even know what Crown Royal was at the time, to me it was just a cool drawstring bag my grandpa had given me.

Not enough in 2023

Now it’s 2023, and taking out my old dice, I wasn’t really excited by what I had. Wanting to build a new perfect dice set, I couldn’t really see my old dice playing into my plans. The formerly clear dice had aged and yellowed, and the bone set, while still in good shape, didn’t really speak to me anymore. Even if I’d wanted to use them, both sets were built from game store dice bins some twenty years ago, and I couldn’t source even decent matches (wrong color, wrong font, etc.)

The only set that still held a strong attraction to me were the original seven from the AD&D 2E box-set. The colors were still burned into my brain, and assuming I got back into playing (maybe even running) games, the educator in me liked that I could easily tell newer players “just roll the yellow one”. Despite their “plainness”, they were approachable, easy to identify, and easy to read.

Even so, the plan was to build a large enough set to reasonably cover the needs of multiple game systems, and while the dice colors spoke to me, unfortunately, much like for my other sets, I simply couldn’t source perfect matches anymore. Even if I matched the color scheme, the originals would always stand out in the set.

So I ultimately decided to keep all of my old dice sets “retired”. I tossed the old Crown Royal bag and put away the clear and bone sets in their own little bags in my game drawer. As for the original seven, I bought the above pictured dice stand and put them up on my shelf with my other geeky mementos.

Setting the criteria for my perfect set

With all this in mind, I decided to start writing out the criteria for building my perfect dice set. I started with the following list of coloring criteria:

  1. Each die type should be a unique color for easy identification
  2. Each die should be a single solid color with black or white lettering for easy reading (and easy re-inking)
  3. Each die should have standard numerals on the top (no pips or Roman numerals, no bottom-read d4s)
  4. The standard seven polyhedral dice must be the exact colors as my original seven

Next the question came, beyond the standard seven, which other die types would I need? As I explored the various games out there, one that caught my eye was Dungeon Crawl Classics (DCC) and its use of “weird” or Zocchi dice: the d3, d5, d7, d14, d16, d24, and d30. I’d also always been fascinated with the Fudge family of RPGs and their Fudge/Fate dice, aka the dF. So I knew I’d wanted some of those too, maybe throw in a coin (i.e. d2), and I had the following criteria for die types:

  1. Dice of these types: d2, d3, d4, d5, d6, d7, d8, d10, d%, d12, d14, d16, d20, d24, d30, and dF.

Then, the next question, how many of each type? It seemed like DCC was unique in it’s need for the Zocchi dice, and the game seldom (if ever?) called for rolling more than one at a time, so I decided just one of each was probably fine. As for the Fudge/Fate dice, the games almost exclusively call for rolls of 4dF, so it seemed like four was the right amount. But, taking those odd dice aside, it seemed like most dice systems fell into one of three camps:

  1. The standard seven
  2. 2d6 / pools of d6s
  3. Percentile (1d10 + 1d%) / pools of d10s

Now obviously, I could just buy, say, ten of each of the standard seven and probably have it covered, but that would make for a rather large dice bag. Instead, I tried to focus on creating a reasonable minimum set, and started looking for what others actually used at the table. One source of inspiration was the Dice of Rolling set, which claimed to have the perfect number of dice for playing D&D fifth edition (5E). Though at thirty-one dice, it seemed a little excessive for a player set, as I wasn’t particularly interested in optimizing for the game I was least interested in playing.

Some smaller sets that caught my eye were the Kraken 12 and Kraken 14, again, both geared toward D&D 5E. All of the sets seemed to acknowledge the benefit of at least four d6s for character creation and two d20s to handle the very popular advantage / disadvantage mechanic of D&D 5E, which has since been borrowed by many other systems. Including my old sets, I came up with the following potential distributions:

Die TypeStandardExtended (3E)Extended (5E)Kraken 12 (5E)Kraken 14 (5E)Dice of Rolling (5E)
d2000110
d4121115
d61444410
d8111115
d10111115+1
d%111111
d12111112
d20112242
Total71111121431

I ultimately decided to go with a sort of “double the extended amount” system for the standard seven types. That is to say, defining the “extended amount” as:

  1. Start with one die of each type
  2. Bump the number of d6s to four, recognizing both D&D-style character creation and the overall ubiquity of d6-based games
  3. Bump the number of d20s to two, recognizing the popularity of the advantage / disadvantage mechanic

This gave me the eleven dice of the “Extended (5E)” column in the table. Then, I doubled that set to get twenty-two dice. Why double?

For starters, imagining I’m in a situation where another player has either forgotten or doesn’t have dice, I could easily loan them a complete extended set for the session. Otherwise, looking at most TTRPGs, with the exception of d6 and d10 dice-pool games, it’s pretty much diminishing returns to have more than two of any one die type ready up-front. One die is necessary, two die common, more than that – I’ll either borrow what I need or just roll more than once.

Furthermore, at eight d6s, I’m pretty well covered for plenty of d6-based games, dice-pool or otherwise. Maybe I’d be short for d10 dice-pool games like the World of Darkness (WoD) RPGs where ten dice is standard, as I only have four (including using the d% percentile dice). But honestly, if I ever found myself planning to play a WoD game, I’d probably just straight up buy a dedicated (suitably macabre) d10 set for it.

This gave me a total of thirty-four dice (really, thirty-three dice and one coin) in my perfect set. Overall, I think my dice distribution makes for a healthy balance of being portable, versatile, and also convenient to play with. So with that, I specified my criteria for quantities at:

  1. Dice of the following quantities: 1d2, 1d3, 2d4, 1d5, 8d6, 1d7, 2d8, 2d10, 2d%, 2d12, 1d14, 1d16, 4d20, 1d24, 1d30, and 4dF.

Sourcing my perfect set

With my criteria in place, I hit the internet to see if it would be even possible to source a set of dice that worked. I was encouraged early on by finding Dice Game Depot, which has a huge selection of dice, lets you buy individual dice in whatever quantities you want, and had the exact colors for the standard seven that matched my originals.

The other dice, let’s say, were a bit harder to find. The biggest problem was finding unique solid colors for each of the remaining die types. There was a real limit in the availability of sets of Zocchi dice in general, let alone finding sets of solid colors, let alone finding solid colors not already taken by the standard seven, let alone buying an individual die instead of a whole set.

In took weeks, but in the end, with some clever searching and a lot of luck, I finally succeeded in securing sources for the Zocchi dice, and was able to prove out my color scheme across the fifteen types of dice:

With a lot of patience for international shipping, I finally ended up with a complete set (minus the coin):

And because of shipping costs and never wanting to do this again, I made sure to buy enough for two complete perfect sets (plus a spare standard seven, just in case):

With the Crown Royal bag long gone, I bought these wonderful tapa-print zipper bags from Etsy to contain my new sets. I even created my own little lanyard pulls for the zippers:

The last thing was to source coins for the d2s. To be honest, I was on the fence for a while about buying dedicated coins for these sets, until I found these lovely sun and moon coins on Etsy. Then, after a playing a few games, and finding it convenient to have a way of keeping counts, I also created some ranger beads and added them to the bags too:

The final result

In the end, I succeeded in building my perfect dice set (two of them!) which met all of my criteria. It was a fun project, and while I do occasionally pick up random pretty matching sets that catch my eye (and maybe bought a ton of very pretty pip-style d6s) these sets have been perfect companions for my TTRPG explorations.

/jon

P.S. If you’re interested in trying to copy my work, I’ve listed where I sourced my dice below. Note that it’s been almost a year since I built this set and some of the links may not work anymore.

Die TypeStyleSourceQuantity
d2Sun and Moon CoinEtsy1
d3Pink (w/ White)Etsy1
d4Green (w/ White)Dice Game Depot2
d5Light Orange (w/ White)Ebay1
d6Red (w/ White)Dice Game Depot8
d7Purple (w/ White)Ebay1
d8Blue (w/ White)Dice Game Depot2
d10White (w/ Black)Dice Game Depot2
d%White (w/ Black)Dice Game Depot2
d12Yellow (w/ Black)Dice Game Depot2
d14Black (w/ White)Ebay1
d16Indigo (w/ White)Ebay1
d20Orange (w/ Black)Dice Game Depot4
d24Light Purple (w/ White)The Dice Shop Online1
d30Light Blue (w/ White)The Dice Shop Online1
dFIvory (w/ Black)Etsy4
Total34

Learning to Paint Miniatures Part I: Getting Started

A few weeks ago I posted about my introduction to the world of miniature painting, resulting in my very first painted miniature: the skeleton Sir Harry Hausen. After that I guided experience, I was hooked, and eager to get my own supplies and my own minis.

The first step was a bunch of research and setting a budget. I know how easy it can be to substitute “buying gear” for actually doing a new hobby, so I decided up front that I wanted to keep things simple and focus on removing the barriers to actually painting. To me that meant not just buying the bare minimum of painting supplies, but also finding a good set of “practice” miniatures. Specifically, I hoped to find some that were both cheap enough that I didn’t feel bad about messing them up, but also with enough variety that I wouldn’t get bored with them (no 100 skeleton packs or anything).

Eventually I settled on this 20 pack of unique fantasy miniatures from Path Gaming for $20:

At only a $1 a piece, and each a unique model, I was satisfied I’d get plenty of experience painting them. I also bought a Vallejo 16 color fantasy paint set, some Tamiya spray primer, and Testors spray varnish, some cheap brushes and some odds and ends. In total I spent $97.79 (not including tax) getting myself started:

ItemCost
Tamiya Gray Fine Surface Primer 180ml TAM87064$11.00
Testors Spray Laquer Dullcote 3oz TES1260T9.49
Mr. Pen Paint Palette Trays x44.99
Vallejo Fantasy Figure Paints 16 Set 72.29927.67
Mr. Pen Paint Brushes 10pc3.99
Path Gaming 20 Fantasy Miniatures19.99
Fiskar Hobby Knife6.27
Elmer’s Tak N’ Stick5.40
Mini Diamond Files 5pc8.99
Total$97.79

With my supplies and tools ready to go, my next step was to select the first minis to prep for painting. I decided on four to start: a goblin warrior, a mushroom zombie, an elven ranger, and a gnome wizard.

After I cleaned up the various excess trim (flash) and mold lines with the hobby knife, I stuck them all to a piece of cardboard and took them outside to be primed with a light grey primer:

With the minis primed, I decided I’d need some kind of handle to hold the minis while I painted them, rather than touching them directly. I got the crazy idea to take a Gatorade bottle, and fill the bottom with rocks so it wouldn’t topple over:

With my supplies ready and the first minis primed, I finally sat down to paint. I decided to start with the goblin warrior, first laying down a black wash to fill in the cracks and crevices (as I had with the skeleton) followed by green for the skin, brown for the armor and shield, red for the loin cloth and a cream for the foot wraps:

For the head I went with black for the hair, then red eyes and bright white teeth so they’d “pop” even at a distance. Overall, the hardest part was painting all the metal details, especially the spikes on the shield. And to finish it off, I glued some fake gravel to the base. And while not great, it wasn’t too bad for my first solo mini. So here’s Mini #2, Punty the Goblin:

With Punty done, the next mini I decided to tackle was the gnome wizard. And while the Gatorade bottle holder worked, I wanted something a little more portable. That’s when I remembered I have a regular supply of small medicine bottles and decided to switch to using those instead. With those ready, I started on the gnome:

I started again with a black wash and then worked on the skin. But when I started on the robes, I began to realize that maybe the starting wash was a waste since the blue covered it all up, and I ended up needing to re-add more black wash to fill in the shadows again. It actually took me several attempts to undo the black and make the robes not look overly messy. I used cream to break up his clothes a bit, and spent a bunch of time trying to get hair and skin to not look so flat. Then came the wand and book, and I was particularly happy with how the gold “magic” writing turned out.

The eyes took forever: no matter how hard I tried, I just didn’t have small enough brushes to get a decent pupil. I ended up using a fine tip marker, and given how much they’re shaded by his hat, I decided to just call it and move on. Overall I learned a lot with Mini #3, Gnome Wizard:

After the gnome, it had become apparent that maybe I’d started with the wrong minis. I’d started with the smaller goblin and gnome minis under the assumption that “smaller mini means less to paint” but it turned out to be more “smaller mini is a lot harder to see the details”. So for my next mini, I decided to try the larger elven ranger. Specifically, after the wizard’s robes, I wanted more practice painting large flowing clothes, as well as some more dedicated practice with metallic paint. The elf with his large robe and metal armor seemed the perfect fit.

I went with green for the cloak, starting with the base color first, then carefully applying black wash to the crevices, and finishing with a lighter green dry brushing, which all worked out fantastically. I painted the non-armor portions of his clothes black, with cream for the skin. For the armor I wanted a bright gold – this was going to less “stealthy ranger” and more “elite guard ranger”.

Not satisfied with how I’d done metals previously, I researched and discovered that the best effect comes from painting the metallic paint over a specific base color – so I got the crazy idea of painting a range of possible base colors on the mini’s base and then brushing gold over it so I could compare the results. I ended up choosing a yellow base color (which was very thin and took several layers to build up) before adding the gold on top.

Then came the first major hurdle of this mini – getting out the detail in the armor plates, which just wasn’t really visible under the paint. I tried applying washes to the shadows, and dry brushing more gold on the highlights, but I ended up having to do it multiple times before I was satisfied and ready to move on. The torso and arms turned out fine, but I just couldn’t get the legs to cooperate and so just let them be.

Then came the other major hurdle with this mini: the head. I’d added a flesh wash over the cream skin, but when I tried painting brown for the hair, some got on the face. In trying to fix the face I couldn’t get the color to match and the result was awful. So for the first time, I actually used a wet cotton swab and rubbed off all of the paint on the head and started over completely, this time with peach skin, the flesh wash, and finally the brown hair, much more carefully this time.

And this time, I got the eyes right pretty much on the first try. Progress! To finish him off I re-blacked the base and added the brown gravel and a little stone to make it more interesting. I didn’t want to use grass because I didn’t want any other green to distract from his cloak. So a lot of difficulties but also some good lessons, and with that, we have Mini #4, Elven Ranger:

With the ranger done, all I had left from this batch was the mushroom zombie. I decided that this time I wanted to paint a mini in a more social environment, so I took with me to Verne & Wells and decided to paint him exclusively with the club’s paints, and only when I could schedule painting with others. It took a lot longer this way, but it also meant I got to show off my progress as I worked on him (and get real-time advice):

I started with a sort of pale green for the skin and a “desert yellow” for the pants, followed by a brown wash, which really brought out the details. I lightened up the skin with some more of the flesh color, then used another yellow for all the little sores on the body.

At this point I should probably mention, if you hadn’t already figured it out, that I didn’t stick with original materials list for very long. By this point I’d also invested in the various basing materials, some washes and a set of finer tipped brushes which made doing the sores so much easier than if I’d used my regular brushes.

But anyways, once the sores were done, I decided to tackle the “hero” mushrooms on his shoulder, with a clear goal of making them little Mario mushrooms. I loved how they turned out, and after that, I painted the eyes black with red pupils (again with the tiny brushes, so useful!)

The final part of this mini was to do the base, and I was getting tired of the plain gravel I’d done on the goblin and the elf. I really wanted to make this zombie look like he was shuffling through a swamp. And with that, we’ve come to am interesting question here with this foray into miniature painting: why am I even doing it?

First off, at even the most surface level, it’s a very fun and relaxing creative outlet, something I’d been looking for for a while. The painting itself is very enjoyable to me, and easy enough to break down into small bits of time to squeeze into my schedule.

So why fantasy minis, and not say, other kinds of models? Cars? Tanks? Ships? Gundam? Well, I’m not as interested in building or painting such mechanical things, and while I might try my hand at some more sci-fi models, I’m very much not interested in building anything military that’s modern and/or contemporary.

But really, the thing that fascinates me the most in this field isn’t the minis, but all the work modellers do to make “background” terrain: natural landscapes with buildings, trees, bushes, etc. See, my father is very much into model railroads, and so I grew up doing that with him. I’m not completely new to making things at tiny scales. But while he focuses most of his energy into the track layouts and building, repairing, and running the trains, I found myself way more interested in all of the surrounding scenery.

For me, someone who doesn’t play war games or mini-heavy RPGs, I don’t really have a place for minis “as-is”. But I’m very excited at thought of making little fantasy dioramas, and to do that, to really make them fantasy and not just a generic landscape, I’ll need some clear fantasy elements like minis. So you might say I’m learning to create cool minis so I can justify making cool dioramas to put them in.

Anyway, back to the mushroom zombie, I really wanted to try my hand at some terrain modeling and make his base a stand-out feature of the mini:

I wanted to make the base look muddy and gross, but first I started with a dark green on the base just to cover any spots that might show through. Then I mixed some brown paint with some fine “snow” base material and spread it around. I kept adding layers of brown, both paint and washes, and even some black wash for the deep shadows. Then I dry-brushed various other colors including some “dead flash”, some light browns, all with the goal of making the ground even grosser. Finally I glued on a grass tuft and some bits of mossy foam lichen.

And with that, here’s Mini #5, Mushroom Zombie:

And in fact, I was so proud with how he turned out, when taking these kind of standardized “final photos” I couldn’t help but take one more zoomed in on his base a bit:

With these four minis complete and on my shelf, I definitely feel like I’m on the right track with my practice plan. Each mini has provided different challenges and taught me something new, probably more than if I’d just painted through dozens of identical characters. It also gives me the variety, so that even if I get bored or frustrated with a particular mini, I know the next one will be something fresh.

And at the end of the day, it’s always nice to make something physical you can hold in your hands, instead of the mostly digital creative outlets I usually have. So, here they are, the first four practice minis:

/jon

My introduction to Miniature Painting

In April of this year, I got the opportunity to attend Geek Xtravaganza 3, a small local convention with vendors selling geeky products. It was a lot of fun, but the highlight for me was finding a set of Hawaiian warrior miniatures for sale:

They were made from pewter, and seeing them in the display case, I just knew that I needed a set of my own. I bought them with an opposing set of Kiribati warriors and a game book for small-scale “tribal” skirmishes.

Now, I was more interested in the minis just for decorative display pieces. I don’t play miniature war games, so I mostly bought the book just as a interesting reference guide about “primitive” skirmish tactics. Nor do I have much of a history with minis – I recall having a couple from my early D&D days some 20+ years ago, but even then the campaigns I played in didn’t really use them all that much.

So it was much to my surprise when, instead of reaching into the display case to collect my purchase, the seller retrieved several little baggies of unpainted, unassembled miniatures from another box to wrap them up for me. It hadn’t even occurred to me that I’d have to make them up myself.

My first thought was, “Great, I don’t even know where to go from here.” The last time I’d tried anything remotely similar was an attempt to build a scale model of U.S.S Defiant from Star Trek a couple years ago – I got as far as clipping out and assembling some pieces, then bailing after watching some tutorials on painting and how to apply wet decals.

However, the convention was partially sponsored by the Verne & Wells geek social club, of which I had recently become a member. And fortunately another member, one with a long history painting minis, expressed interest in instructing beginners as a way of encouraging some social painting events at the club.

So a couple weeks later, not knowing what I was doing, and not wanting to start off with the beautiful Hawaiian minis I’d just bought, I found myself sifting through the small collection the teacher provided. I ended up choosing a simple skeleton warrior:

The teacher primed it white, and at their recommendation, I started with a black wash as a base then “dry brushed” white onto the bones:

I won’t claim to have done an amazing job (I know now that I had way too much paint on the brush), but not bad for my first ever dry brushing. It definitely looked like a beat-up old skeleton. That was as far as I got my first session, but even then I knew I was getting hooked.

The next time I met with the teacher, I decided to tackle the sword and shield. I knew I wanted to lean into older, more antique equipment, so I started with a bronze metallic paint. The sword was completely bronze, but for the shield I only trimmed its edge, and then used brown for the wood and the straps. Finally, I wanted to accentuate the age and deterioration of the shield by adding the slightest hint of a former paint job, the red and blue of some forgotten standard:

With that, all that was left was to do the base. At the teacher’s direction, I started simple, painting the base black then applying just some basic green grass flocking:

And I was done painting my first mini! I decided to name him Sir Harry Hausen, and the teacher said I could keep him if I wanted. I offered to “pay it forward” and instead buy the teacher another unpainted mini for the next student. After that, I was so excited, I went to one of the club’s many “terrain” tables, and started taking photos of Harry at every angle:

To paint Harry I’d used the club’s paints and the teacher’s supplies. I knew that if I were going to continue I’d have to start gathering my own painting supplies and some more minis to start practicing. Which would mean setting a budget and doing some research.

But first, the last and final work on Harry was to spray him with a matte varnish to protect the paint, and tag him underneath with a #1 as the mini that got me started. That done, I took the time to get some proper photos of him:

/jon

Sony PSP 3001 Battery Tests

Note: I originally posted this on r/PSP. However, due to the uncertain future of Reddit, I’ve decided to archive it here so my work isn’t lost. Original: PSP 3001 Battery Test: Cameron Sino FTW.

Hello!

Over in r/nds I’ve been testing the options for aftermarket DS batteries and posting the results. I have each of the DS models and wanted to see how well the old OEM batteries stood up to new ones.

Folks asked that I do the same for the PSP. I only have the one PSP-3001, (which I bought used, with CFW if that matters), but hopefully these results will still be useful in finding replacements for other models as well.

The test was to start up the machine from a cold boot and let it run in the menu until the battery died. Sound was completely off, WiFi was off, and the brightness was set to max with auto-brightness off. Auto sleep was also off.

The original old OEM battery is rated at 1200 mAh and lasted 3h 20m.

The first aftermarket models I tested were a two-pack branded TFSeven for $20 on Amazon. Both were rated 1200 mAh, but one lasted 3h 45m and the other 4h 46m. I don’t know why one is so much better than the other but I retested both with similar results.

The next battery was from Cameron Sino, rated at 1200 mAh and lasted 4h 39m. It cost $14 on eBay.

The last battery I tested was a Cameron Sino rated at 1800 mAh which lasted 6h 27m. It cost $19 on eBay and included a larger battery door replacement to fit the larger battery.

In summary, the Cameron Sinos were my favorite as they have shown a consistent above-average quality in my DS tests as well.

Personally I’d have to spend more time with the 1800 mAh battery to see if the extra weight/shape affected my playing. Aesthetically the battery cover matched the rest of the unit very well.

Hope this was helpful!

Edit 1: to clarify that I bought the PSP used, and the OEM battery was what it had installed, so I don’t know how old it is.

Edit 2: To address longevity concerns I’ve charged up the batteries and am going to let them sit for a couple weeks then test again. I don’t play the PSP often but with the OEM battery I feel like it’s always dead when I want to use it, despite doing full shutdowns. I’ll report back here when I’m done.

Edit 3: Well, it’s been three months, and I’ve redone the test with the Cameron Sino 1800 mAh I left charged on a shelf. The battery lasted approximately 6h30m, indicating that the battery didn’t seem to lose any charge in that time. Now it’s possible that longer-term it will survive less charge cycles than an OEM battery might, but I really don’t have the time or interest in testing that. The battery is a winner in my book.

/jon